As a student of the Ribaat Program, I will ensure to abide by the following:
- All work I submit (assignments, papers, and tests) will be fully my own, and I will clearly cite any material taken from other sources.
- I will not attempt to record, electronically or otherwise, the audio or video of any class sessions in part or in full.
- I will not share links to the class, class recordings, or course materials with unregistered students.
- I will protect the privacy of our female instructors by viewing the class in such a way that it is not readily viewed by male household members.
- I recognize these classes are meant for students over age 17 and I allow underage viewers at risk of them hearing what may not be age appropriate.
- I will not engage in any activities that will dishonestly improve my results or dishonestly improve/hurt the results of others.
- I understand that the registration fees are non-refundable and non-transferable to other students or other terms.
- I agree that all content from Ribaat classes, workshops, and seminars is the intellectual property of the Ribaat Academic Institute and cannot be re-taught, re-purposed, or utilized in personal, local, or online teaching platforms without the written consent of the Director of the Ribaat Academic Institute.
- I will respect Ribaat instructors, team members, and fellow classmates by contacting them only through official Ribaat channels of communication and by maintaining a respectful and positive tone in all communications.
- I understand that failure to comply with any of the above may lead to removal from the program.

- Registration/General Questions | registration@rabata.org
- Arabic Program | ribaat.arabic@rabata.org
- Tajwid Program | ribaat.tajwid@rabata.org
- Student Advising | advising@rabata.org
Choose your calendar program and follow the instructions to properly subscribe to the iCalendar feed. This ensures that you will receive the latest changes to the calendar. Please note that how often your application syncs to the latest feed is dependent upon the application settings.
Google Calendar
- Click the down-arrow next to “Other calendars”.
- Select “Add by URL” from the menu.
- Enter the iCal feed URL in the field provided.
- Click “Add calendar”. The calendar will appear in the “Other calendars” section of the calendar list to the left.
Outlook 2010 (and above)
NOTE: Outlook 2010 and above for Mac does not support CalDav, and so cannot subscribe to remote iCal feeds. The directions below pertain to using Outlook on Windows.
- Open up Outlook.
- Switch to Calendar “mode”.
- Click the “Home” tab on the Ribbon.
- Under “Manage Calendars”, click on “Open Calendar \ From Internet”.
- Enter the iCal feed URL into the “New Internet Calendar” field, then click “OK”.
- Click “Yes” when prompted to verify that you want to subscribe to the calendar.
Outlook 2007
- In Outlook, on the “Tools” menu, click “Account Settings”.
- On the “Internet Calendars” tab, click “New”.
- Enter the iCal feed URL, then click “Add”.
- In the “Folder Name” box, type the name of the calendar as you want it to appear in Outlook, and then click “OK”.
Mac OS iCal
- In Calendar, choose “File > New Calendar Subscription”.
- Enter the iCal feed URL, and then click “Subscribe”.
- Enter a name for the calendar in the “Name” field and choose a color from the adjacent pop-up menu.
- To update your copy of the calendar when changes to it are published, choose the update frequency from the “Auto-refresh” pop-up menu.
- Click “OK”.
- To make changes to the calendar, click the name of the calendar, and then choose “Edit > Get Info”.
Yahoo! Calendar
- In Yahoo Mail, click the “Calendar” icon.
- In the “Calendars” column, click the “Manage Followed Calendars” icon next to “Following”.
- Select “Follow Other Calendars”.
- Enter a name for the calendar.
- Enter the iCal feed URL.
- Select a color for the calendar.
- Select “Refresh” and “Remind” options.
- Click “Save”.
iOS 11+ (newer iPad, iPhone, etc.)
- Open the “Settings” app on the device.
- Scroll to “Accounts & Passwords”.
- Under “Accounts”, tap “Add Account”.
- Choose “Other” from the options and select “Add Subscribed Calendar”.
- Paste or enter the calendar URL being subscribed to and then click “Next”.
- Once verified, the device will ask for further information (like “Username” and “Password”), leave these blank.
- Toggle the “Turn off SSL” option, you can toggle it on.
- Hit “Next” again and then “Save”.
- Now in the “Calendar” app the subscribed calendar should appear.
iOS (older iPad, iPhone, etc.)
- Open the “Settings” app on your iOS device.
- Tap on “Mail, Contacts, Calendars”.
- Tap on “Add Account” under the “Mail” section.
- Tap on “Other”.
- Tap on Add Subscribed Calendar” under the “Calendars” section.
- Enter the iCal feed URL and tap “Next”. Your device will then attempt to verify the feed.
- Change any additional details (such as the description) and then tap “Save”.
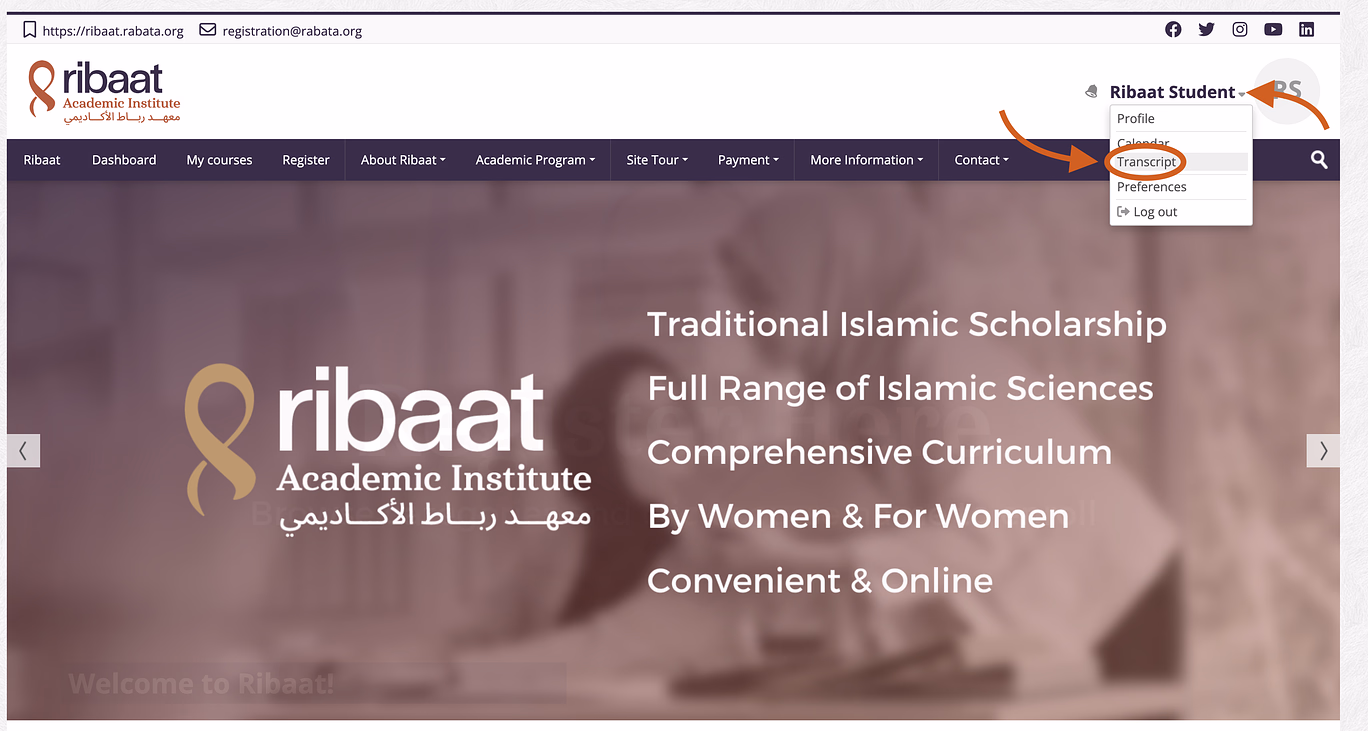
On the top right, click on the arrow next to your name for the drop-down menu. Then select Transcript
Please keep in mind that grades are not final until you receive an email from the Ribaat Grading Team that will confirm the course grade is final. Until that point, you can assume that grades will be changing as the term progresses.